Exercise 5 Part 2
For those of you wishing to complete , revise or redraw the final exercise of this term here is a recap.
For those of you who missed last weeks class on 7th December, this post provides a conclusion to the exercise that began in last weeks post.
Step 8
In the previous post the light source was established, in this case from below, and the appropriate shading was applied.
You will notice that the drawing has been adjusted. The dragon's wings are now fully extended and the ground details have changed slightly. The ground is now made up of broken rock and molten lava, creating the main source of light.
Step 9
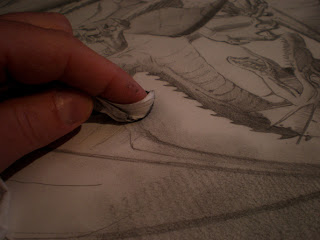
Here the darker areas have been blended in with the lighter areas by carefully smudging the layers. If you are planning on doing the same, make sure the tissue is clean or if you are using your fingers, make sure they aren't greasy, or it will produce a grease stain that will be near impossible to remove.
Step 10
Once you have finished shading and blending, create the final highlights using an eraser and tidy up the outer lines, giving more definition to your figure work.
Feel free to e-mail me your results at flameboy_1@ntlworld.com or post them on facebook and I will comment back.
Have a great Christmas and it will be great to see you all next year.
I am a professional illustrator, providing illustration for books, magazines, posters and (rock band) merchandize . I also storyboard for film, tv, video games and tv ads. Teaching is just something I enjoy doing. Just an attemp to give something back. Not everything I post here will necessarily work for everyone.
Wednesday, 15 December 2010
Thursday, 9 December 2010
September-December Week 9 07/12/10
Exercise 5
This exercise will incorporate composition, figure drawing, lighting and storytelling.
As always with these exercises, I began with a series of thumbnails to help decide the point of view of the image.
Although thumbnail 1 (above) is very dynamic and intense, I felt it was not going to allow you to develop other areas such as landscape and a narrative, so I pulled back for a wider shot.
In thumbnail 2 (above) we can clearly see that the hero battling the beast has ended up on the top of a ruin of which there is no easy escape and we can also see the terrain he has battled through, and also there is evidence of possibly, previously failed attempts at slaying the beast..
With his composition, the image can also be cropped tighter to cut out the landscape and give a shorter narrative.
I also considered the benefits of the dragon having his wings wrapped around the battle area or fully splayed out.
I will leave it to you which version to follow. You will notice further down that I have drawn the wings folded, but I have since decided to have them fully opened, so if you decide to do otherwise, refer to the thumbnail. Part 2 of this exercise will show the revised wings.
Step 1
Loosely sketch out the rough shapes that compose the image.
It may help to draw a faint vertical centre line to help balance the shapes.
Step 2
Still keeping the line work loose at this stage, sketch out the limbs of the dragon and mark out the spiral steps.
Step 3
Try not to rush the steps as this could spoil your drawing. Take time to plot them. They don't have to be technically precise, because they are part of a ruin and show decay, but they want to look convincing so keep the spaces in proportion.
I have also added a rubble of skulls and bones as a device to lead the viewer into the scene. This however is optional.
Step 4
Here the dragon has been defined.
Step 4 (Detail)
Here is a blown up version of the warrior so you can get the muscle detail.
Step 5
Now establish the light source.
In this case the light source is from below.
Friday, 3 December 2010
STAR STUDENT OF THE WEEK
I am very impressed with Vanessa's work this week.Vanessa, I wish you had the confidence to produce more of this work in class. I know you have it in you to produce this standard of work every time. Please keep believing in your ability to do this.
September-December Week 8 30/10/10
Exercise 4 Pt 2
Step 10
Step 11
Step 13
Step 15
Step 8
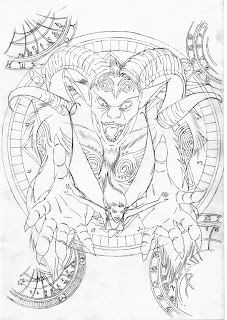
Once the basic line work for the drawing has been created, it is a good idea to review the work in order to make any last minute changes. At this stage the Faun’s horns have been reconsidered and mystical chart diagrams have been added for interest. The charts are loosely based in magic circle and astrology charts but with a bit of artistic license thrown in.
Step 9
The main light source for this drawing will come from below so everything towards the top will be dark and the highlights will appear on the lower parts of the figures. Before the background shading is created, the lighting for the main figures will be established.
Step 10
Once the light source has been established, the background tones can be applied.
Step 11
Some mid range tones have now been added by gently shading in and around the white areas and blending into the darker areas.
Step 12
Darker areas are now strengthened by adding an extra layer and also some harder lines for definition.
Step 13
A stronger, crisp hard line has been added to the outline of both characters to help define their shape against the various tones of shading.
Step 14
Step 14
Strengthen the line work using the magic charts by carefully running a pencil over the top. Make sure the point is sharp. A HB should be adequate for this part.
Step 15
Add highlights by using a fine edged eraser and carefully erasing areas where the light would fall.
Subscribe to:
Posts (Atom)